When Bumpers Were Real and Steel
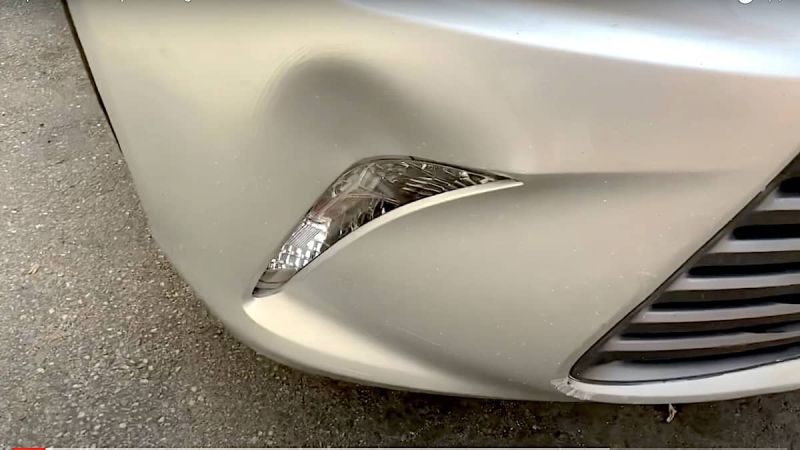
Back in the day when cars were made of steel, a dented bumper meant a trip to an autobody specialist and at least a few days of repair while the dent was hammered out, the body puttied, the bare metal primed and then finally painted with hopefully an identical and matching paint job.
Today, it’s a different story. Many bumpers are covers made of plastic and the problem is resolved by a shop tossing the old bumper and re-installing a new one. It’s not cheap and can cost over $1000, but it is effective and quick. In some cases, the shop may decide to “pop” the dent out hoping the paint isn’t too damaged, but then again this can still cost you a few to several hundred dollars.
A Simple Fix Today
Recently, Consumer Reports offered some advice on how to repair a dented bumper that involved little more than a handheld hair dryer or heat gun and a rubber ended tool or stick, some elbow grease and a DIY attitude.
While at first glance it seems to be simple to be true, I have personally observed some bumper cover dings wider than my palm pop out on their own after a day parked inside a hot garage. The malleability of plastic and tendency to resume its contour under heat, makes this possible…and a nice surprise---especially when you are trying to explain to your spouse how you dented their car.
Consumer Reports DIY Fix
Basically, the CR steps to bumper repair are the following:
1. Get Access Behind the Bumper---you will likely need a trouble light for this depending on the make of your car to find whatever screws or pop-out fasteners are used to secure a section of the bumper cover to the rest of the body. You may also need to remove a fender liner or some other aerodynamic valence that might be in the way. The goal here is to get access to both sides of the dent.
2. Apply Heat to the Dent---using a relatively powerful hand held hair dryer or a mechanics hot air gun, warm the surface of the dent carefully. Do not hold the heat too long at any single spot for too long or you will risk damaging the paint.
3. Gently Push Out the Dent---using a rubber tipped dowel or a specialty tool (preferred) for working on plastic body dents, once the plastic bumper is heated adequately, push the dent out from the inside until the plastic pops back into its normal shape. Repeat the process on any remaining small creases or dings. Reattach any removed fasteners.
Problems With the Consumer Reports DIY Fix
The CR DIY fix for a dented bumper advice is a little too abridged for someone who has never done this kind of thing before. However, the point of the article is that with a little research and some simple tools, this is a repair job most car owners can do to save a significant amount of money on used cars. To their credit, CR does recommend that a search for YouTube videos demonstrating the 3 aforementioned steps will be helpful.
That said, here is one YouTube video that does a very good job of explaining and showing how to fix a dented bumper providing the damage is not too extensive.
Bumper Dent Repair - How To Remove a Dent In a Plastic Bumper
Key Points the Video Improves Upon Consumer Reports Advice
How the YouTube video greatly supplements the CR advice is that it:
• Focuses on how to avoid damaging the bumper’s paint.
• Adds a few more tools to the job to increase your odds of success.
• Tells you what temp is right for popping a dent.
• Recommends heating both sides of the dent before pushing it out.
Additional Recommendations
Depending on the type of fasteners your car body and bumper uses, it is a good idea to take a preview of them (take a photo with your phone) beforehand, and then ask your local parts dealer if they carry those fastener types and can recommend the proper tool for disengaging them. You want to avoid causing any damage during the repair and it’s a good idea to have some spare fasteners on hand in case a plastic one snaps on you when using a tool to get access to the bumper cover.
One additional recommendation I cannot stress enough is that you should always, always wear safety glasses whenever using any tool no matter how simple the job may seem. It does not matter whether you are experienced or not…some of the craziest things happen in a garage. And happen fast. No job is worth your eyesight.
Recommended Tool List with Prices and Cost Savings
I am a big believer in saving money when it comes to tools. In most cases, discount tools are good enough for most jobs and can be found relatively cheap at outlets like Harbor Freight Tools. As an example, here is a list of recommended tools for the DIY repair and current prices.
--Chicago Electric Drop Light $13.99
--Pittsburgh 5-piece Automotive Trim And Molding Tool Set $8.99
--Pittsburgh Rubber Handle (use the handle to press against the dent) Mallet $6.99
--Warrior 1500 Watt 11 Amp Dual Temperature Heat Gun $16.99
--Ames Instruments 12:1 Infrared Laser Thermometer $24.99
--Western Safety Glasses $1.79
Total Cost: Under $75 (not including tax). Note in many cases, you can get 10-20% off the total by following Harbor Freight online and using their frequent coupon offers or by enrolling in a special membership.
For more about how to save money with used cars, here is an informative article about good fuel efficient used car choices.
Timothy Boyer is Torque News Tesla and EV reporter based in Cincinnati. Experienced with early car restorations, he regularly restores older vehicles with engine modifications for improved performance. Follow Tim on Twitter at @TimBoyerWrites for daily Tesla and electric vehicle news.
Set as google preferred source


