

Follow us today...


So, your Toyota hybrid battery has finally given up, and you're contemplating a repair. With a sea of online information, it's easy to get overwhelmed. Fret not! This detailed guide is designed to walk you through each step, ensuring you can repair your battery and do it even better than the well-known Chris Fix. Let's dive in and rejuvenate your hybrid's heartbeat!
To be clear, I am not bashing Chris Fix; however, for the repair to stick and last, this is the best process to get maximum results. I appreciate and think highly of Chris Fix and all he does to support the DIY automotive community.
Step 1: Assessing the Battery's Health
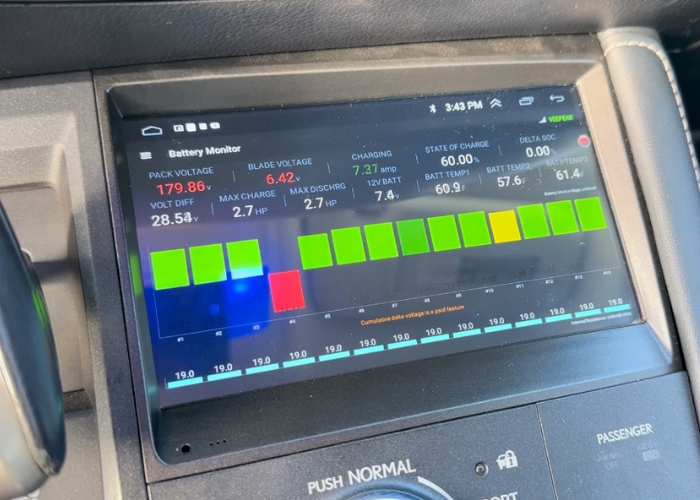
Before I do anything, I always check the car out with Dr. Prius. It is a fast and easy way to see what I am up against when replacing modules. Once I get my data, I will pull the hybrid battery out for repair and further inspection.
Cleaning and Checking the Hardware
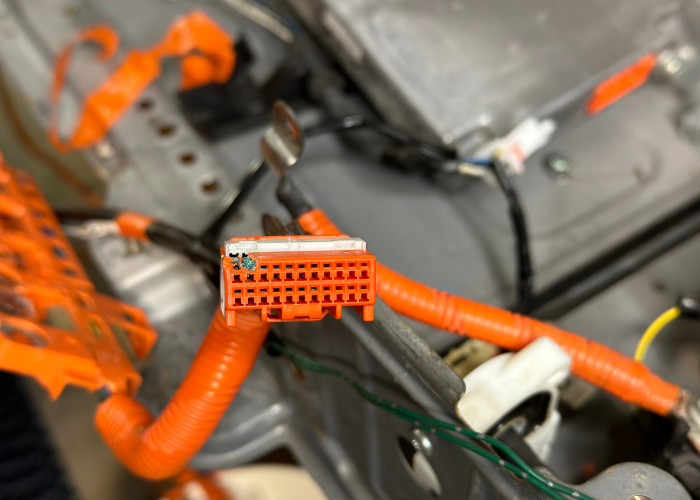
- Inspect the Harness and Busbars:
Examine the battery harness and busbars. Corrosion here can seriously inhibit electron flow, reducing efficiency.
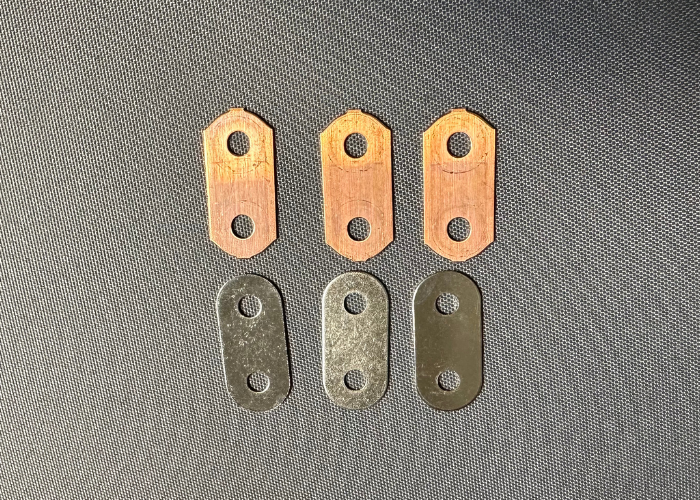
- Addressing Corrosion: If you find corrosion, especially in nickel metal hydride (NiMH) batteries, consider switching to nickel-plated busbars and stainless steel nuts. They offer better corrosion protection and ensure smoother electron flow. To those who say nickel plating is terrible for your battery. In summary, while nickel plating slightly reduces the conductivity of copper due to nickel's lower conductivity, the impact is often minimal due to the thinness of the plating. The primary advantage of nickel plating is its enhanced corrosion and oxidation resistance, which can be crucial in maintaining long-term electrical performance in specific environments.
Module Assessment
- Resting Voltage Check:
Measure the resting voltage of each module. This test indicates the module's state of charge and general health. If the modules are 7.2v or higher, you can group them up so they can go through the next test which is internal resistance.
- Internal Resistance Measurement:
High internal resistance in a module is a red flag, indicating reduced efficiency and capacity. High internal resistance in a nickel module can lead to complete failure and even explode. Finding these modules now will be a saving grace to keep them from invading your pack.
- Capacity Testing:
Tools like the Prolong Pro Battery Module Tester come in handy to thoroughly assess the capacity. Alternatively, you can manually discharge the module and measure the time it takes to reach a specific lower voltage, comparing it against standard values. Alternatively, this process can be done with a DMM (digital multi-meter) a hobby charger and a lightbulb (H3 automotive headlight works well).
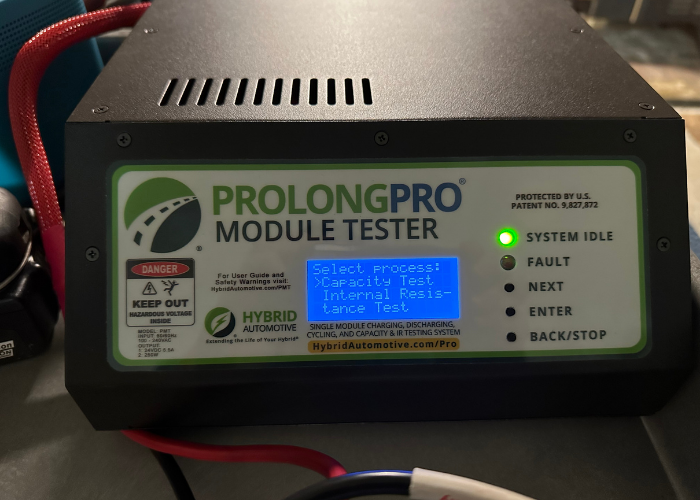
- Load Testing
Load Testing (which can be done on the Prolong module tester), but there are other ways of load testing. The key here is to put down 40 to 50 amps load on each module to see how quickly they rebound. The easier they recover, the better the module. Again, I like things done straightforwardly, so my investment in the Prolong equipment made the most sense. It works, it's reliable, and there is little to think about. You will want to take an inital measurement (voltage reading) then take a measurement after the battery has rebounded. The difference in the two readings is your voltage drop and will give you an indication how good that module is functioning. (See more below)
Step 2: Replacing Faulty Modules
- Identifying Weak Modules:
Replace any module with a voltage drop greater than 1v during the load test. The lower the voltage drop and internal resistance, the more robust the module. Finding weak modules during the internal resistance test will quickly identify which modules must go.
- Module Selection:
Choose replacements that closely match the remaining modules regarding capacity, internal resistance, and voltage. It wouldn't make sense to have a person on their deathbed play soccer with a world-class footballer now, would it? The same idea applies here. If they are within a reasonable and measurable mark from each other, it's best to keep them from playing together. Your pack will only survive for a while, and you will repeat this process. I do not know about you, but I don't particularly appreciate doing the same thing twice.
Step 3: The Crucial Step of Reconditioning
- Why Reconditioning Is Essential:
Reconditioning involves cycling the battery through controlled charging and discharging. This process is vital for:
- Breaking down crystalline formations on the cells.
Older, worn modules cannot compete with younger, more vibrant ones. Breaking down the dendrites that form on these individual cells on the nickel metal hydride battery improves electron flow and overall battery capacity.
- Improving overall capacity and performance.
If you think about a 5-gallon bucket when it is new, it holds 5 gallons of water. However, adding sand, rocks, or debris into the bucket reduces capacity. The same idea or concept is happening to your NiMH battery. That is why I preach reconditioning with balance, so you have the best shot at having your Prius or whatever hybrid you own regain as much lost capacity as possible.
- Equalizing the charge across all cells.
Balance is crucial to ensure that all the hybrid batteries (NiMH) work harmoniously. Referring to the world-class footballer example, you need balance if you want your team to win.
- The Reconditioning Process Cycle the entire battery pack several times (I do four charge and three discharge cycles with the Prolong equipment, which steps the voltage down each time), fully charging and then discharging it. This process ensures all the modules are balanced and functioning optimally.
Step 4: Final Touches
- Reassemble and Test: Once reconditioned, reassemble the battery pack. Finally perform any remaining test(s) to ensure everything is functioning as expected. When using NiMH battery modules, do yourself a favor and get an inch-pound torque wrench. The 6mm nuts on each side of the battery require 48 in-lbs of torque on each nut. Overtighten them, and you could find yourself in a world of pain. Again, doing right the first time is what we are striving for.
Conclusion: Cost-Effective and Sustainable
Rebuilding your Toyota, Honda, Ford, or GM hybrid battery pack can be surprisingly affordable, sometimes costing as little as $100 for new busbars and stainless steel nuts. By following these steps, you can extend your battery's life by 2-3 years or more and save significantly compared to purchasing a refurbished or new battery. This repair gives you ample time to save for a replacement if needed. With the right approach and patience, anyone can master the art of hybrid battery reconditioning, ensuring your vehicle continues to run efficiently and reliably.
The worst case is getting a new battery from the dealer or upgrading to Nexpower LFP. The cost is certainly higher, but starting from ground zero and knowing the pack will work flawlessly is a considerable advantage.
Thank you for embarking on this journey with us. Together, let's continue exploring, discovering, and unlocking new horizons. You can stay tuned for more captivating content to fuel your curiosity and inspire your imagination.
We appreciate your readership and look forward to you joining us on our next adventure. Until then, keep dreaming, reading, and coming back for more!
A recent video tweet by a famous Tesla blogger from China claims that this new Tesla store in Chongqing, China, is the best in the world. The video of the store is going viral.
The store, which is located in the Chongqing-JIEFANGBEI Starlight Plaza, features a 3D ground painting that combines the Tesla Gigafactory Shanghai and Chongqing landmarks.
Peter Neilson is an automotive consultant specializing in electric cars and hybrid battery technologies. He holds a Bachelor of Science in Automotive Service Technology from Weber State University. Peter can be reached on Linkedin and you can tweet him at The_hybrid_guy on Twitter. Find his page on Facebook at Certified Auto Consulting. Read more of Peter's stories at Toyota news coverage on Torque News. Search Toyota Prius Torque News for more in-depth Prius coverage from our reporter.
-Disclosure-
Remember, safety is paramount when working with hybrid batteries. Always follow the manufacturer's safety guidelines and consider seeking professional hybrid repair assistance if you need clarification on any step in the process. You are also welcome to seek me out for help and advice on questions you have regarding repairing and reconditioning these hybrid battery packs. I do not take responsibility for anyone doing their DIY hybrid battery pack repair. These guidelines can be altered to your specific needs, and as such, I absolve myself from all liability for anyone following these repair guidelines.
Follow us today...